

 cs
This section provides solutions for common issues you might encounter.
Where to find OAK in documentation
OAK is the key required for authorization when a camera (or any other Axis network device) is registered and connected to the system via the Axis O3C/AVHS service.
The OAK can be found printed on the documentation included in the camera package.
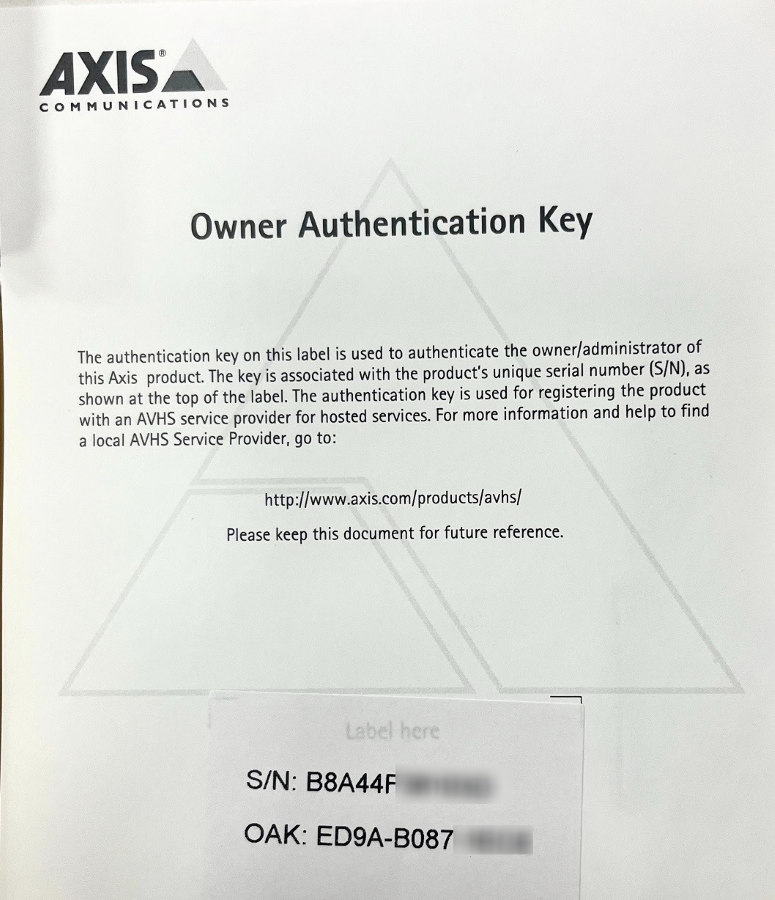
If you do not have a printed OAK, you can obtain it from the camera interface.
Where to find OAK in the camera interface
NOTICE
This feature is available on the camera from firmware versions 5.51.7, 6.50.5.2, 8.40.4, 9.80.2 or 10.0.0.
Log in to the camera’s user interface as an administrator. Make sure the camera has a FW that has this feature (see above).
The paths to display the OAK key are then different for each version:
- Firmware based on 5.51: go to Setup → System options → Support → System Overview.
- Firmware based on 6.50: go to Setup → System options → Support → System Overview.
- Firmware based on 8.40: go to System → AVHS, then click Retrieve OAK.
- Firmware based on 9.80: go to System → AVHS, then click Retrieve OAK.
- Firmware based on 10.0 or higher: go to System → O3C, then click Retrieve OAK.
Re-connecting a camera that has been reset to factory settings
If you reset the camera to factory settings using the Default button on the camera interface or the HW button on the camera body, the camera will be disconnected from the servers. However, the camera remains registered in the system.
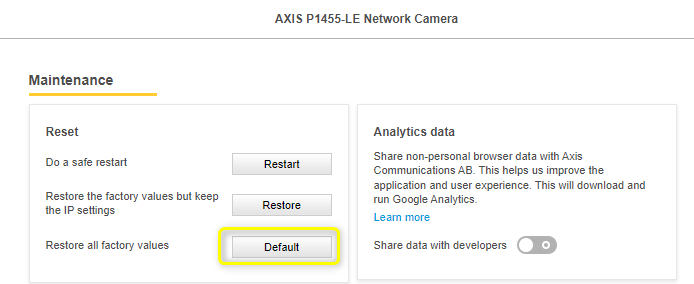
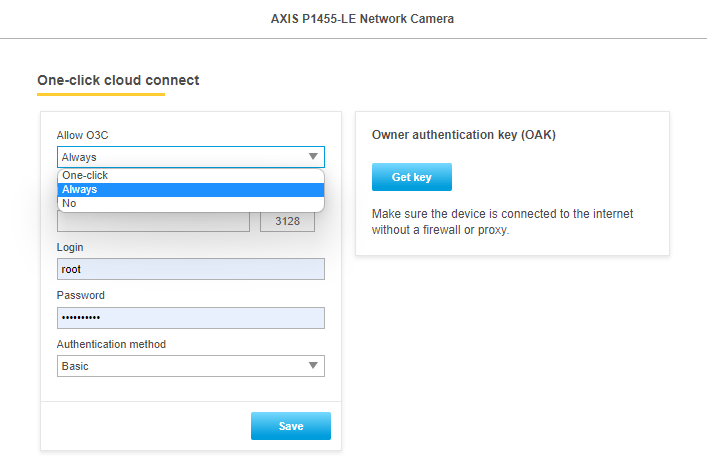
To reconnect the camera, you need to enable the O3C function on the camera, also called AVHS in older versions of FW. There are several ways to enable this function.
- Press the button on the camera body to enable the O3C/AVHS function.
- Suitable when the camera is physically very easy to access or when you are unable to access the camera’s user interface.
- Set this function in the camera user interface (Settings > System > O3C/AVHS).
- Easiest way if you are connected on the same network as the camera.
- By installing and opening the Camera Connector application.
- The Camera Connector application is useful if the camera connection fails in the previous ways. It has some basic diagnostic functions that can tell you where the problem is. Again, however, you need the ability to access the camera’s user interface.
HINT
If you need to reset the camera to factory settings but do not want it to disconnect, use the Restore button instead of the Default button. This will preserve the TCP/IP parameter settings and O3C/AVHS settings.
Credit card can’t be verified
In order to verify and prove authenticity of the credit card, an $0 or $1 charge will be implemeted and only upon succesful authorisation will the credit card then be considered as acceptable, for future subsequent service payments.
The charged amount will then be refunded back to the card.
If the attempt to charge and add the card is not successful, proceed as follows:
- Try adding another credit card.
- Check that the card is not blocked and that it has internet payments enabled. This can be checked via your online banking or contact your bank for assistance
- Contact your bank and ask for verification of the failed payment. If the bank resolves the issue, retry the charge attempt.
- If the above steps did not resolve the issue, contact our helpdesk.
Mobile App in iOS Lockdown Mode
If your iOS device is in Lockdown Mode, our mobile app won’t work correctly. If you need the extreme level of security, but want to use the mobile app, you can exclude it from being impacted and limited by WebKit restrictions.
For further information visit the official Apple Support page here.
Web Application Firewall
In the realm of cloud-based video surveillance, ensuring the highest levels of security is paramount. As digital technologies advance, so do the threats to web applications. In response to these challenges, Web Application Firewalls (WAFs) have emerged as crucial components in safeguarding web applications. One such powerful WAF is ModSecurity, which can play a pivotal role in enhancing the security of cloud-based web services.
Unveiling ModSecurity
ModSecurity stands as an open-source, cross-platform web application firewall, designed to serve as a robust security shield for web applications. Originally developed by Trustwave’s SpiderLabs, ModSecurity is tailored to protect web applications from an extensive range of threats, including but not limited to SQL injection, cross-site scripting (XSS), remote file inclusion, and other malicious attacks.
Elevating Security with ModSecurity
Utilizing ModSecurity in a cloud-based video surveillance application offers a multitude of benefits, ensuring a robust security posture.
- Reliable protection supported by OWASP: ModSecurity provides comprehensive protection against the top ten web application security risks identified by the Open Web Application Security Project (OWASP). To bolster this defense, our ModSecurity configuration is based on the Core Rule Set (CRS) maintained by OWASP. By doing so we ensure the system remains fortified against prevalent attacks, in alignment with industry best practices and the latest threat intelligence.
- Real-Time Threat Detection: ModSecurity employs a rule-based approach to promptly identify and thwart malicious traffic in real-time. By analyzing incoming HTTP requests and responses, it can detect and mitigate attacks as they occur, preserving the integrity and security of valuable data.
- Tailored Rule Set: The ModSecurity rule set in operation is customized to align with the specific security requirements of our system. This flexibility allows ModSecurity to adapt and provide targeted protection, addressing unique attack patterns within the context of cloud-based video surveillance.
- Robust Logging and Monitoring: ModSecurity generates comprehensive logs of all incoming requests and blocked attacks. These logs facilitate the tracking and analysis of security incidents, empowering proactive threat mitigation. Vigilant monitoring is especially critical for safeguarding sensitive data accumulated by our system.
- Versatile Integration: ModSecurity is not confined to a single web server or application framework. It seamlessly integrates with popular web servers like Apache and Nginx, as well as various programming languages and content delivery systems, ensuring compatibility with diverse cloud-based infrastructure.
- Active Open-Source Community: Being an open-source solution, ModSecurity benefits from a vibrant community of developers and users. This active community continually enhances the firewall’s engine capabilities, keeping it up-to-date with emerging requirements to contemporary software of this kind.
How ModSecurity Works with the System
ModSecurity operates as a web server’s module, integrated into the web application’s infrastructure. Upon receiving incoming HTTP requests, ModSecurity evaluates them against predefined and custom rule sets, carefully tailored to our specific use cases. If it identifies suspicious activity or matches known attack patterns, it takes appropriate actions, such as blocking data exchange with the web application, logging event and alerting administrators. This proactive defense mechanism ensures the security of our service.
I need to replace a camera because it is broken, and I have a full license
The license is valid for one camera and cannot be freely transferred to another camera; however, there are two exceptions:
- You can transfer a license from a damaged camera (which is still under warranty)to a replacement camera for free on the condition: You submit an Axis RMA (document stating the faulty serial number of the cam in question) and an Axis Exchange Protocol (document stating the same RMA number and the serial number of the replacement camera. (see our EULA for details);
- You can transfer a license to another camera for $50/50€ within two years of the first license activation date.
If you have the RMA and the Axis Exchange Protocol documentation from Axis, we will transfer the license for free. If you do not have an RMA and your license is not older than 2 years, you can transfer it for $50/50€. In both cases contact us on [email protected].
Axis guidelines to camera settings
Axis general guidelines to camera settings:
Focus: https://www.axis.com/support/troubleshooting/focus
Streaming: https://www.axis.com/support/troubleshooting/streaming
Pan and tilt: https://www.axis.com/support/troubleshooting/pan-and-tilt
Image quality: https://www.axis.com/support/troubleshooting/image-quality
Network connection: https://www.axis.com/support/troubleshooting/network-connection
Please note, due to camera model variations, we recommend to consult your camera’s user manual directly for more specific settings and setup configuration.
Low latency mode
Low latency mode is a feature supported by Axis.
You can optimize the image processing time of your live stream by turning on low-latency mode. In doing so, the latency in your live stream is reduced to a minimum.
This feature is only specific to certain camera models and can be verified by accessing:
1 – Go to System > Plain config.
2 – Select ImageSource from the drop-down list.
3 – Go to ImageSource/I0/Sensor > Low latency mode and select On.
4 – Click Save.
If there is no option to select Low latency mode, the camera model does not support it.
NOTE
When using low-latency mode, the image quality is lower than usual.
Alternative option to power your Axis camera
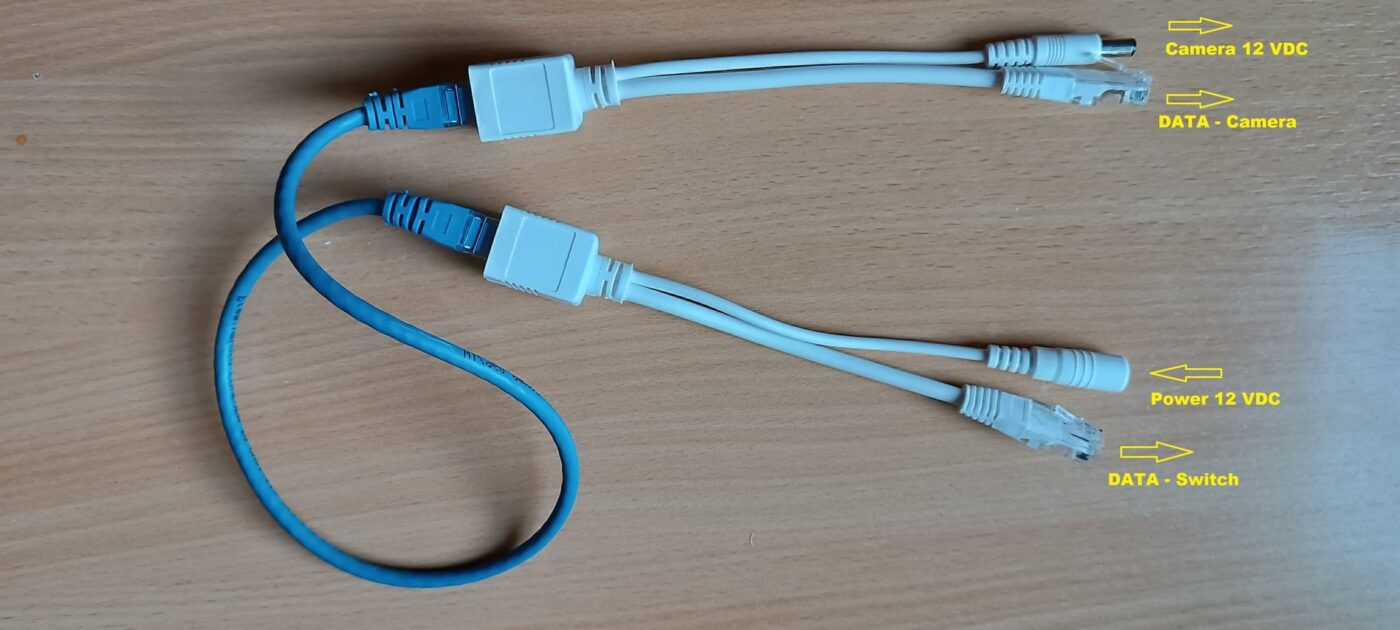
Some Axis Cameras (V5925) require a dedicated power source to power the cam. An alternative solution is to use a passive PoE cable, as shown in the image.
Note, you will require an appropriate power adapter as well.
Insert the stream from an IP camera into your TV distribution as a TV channel
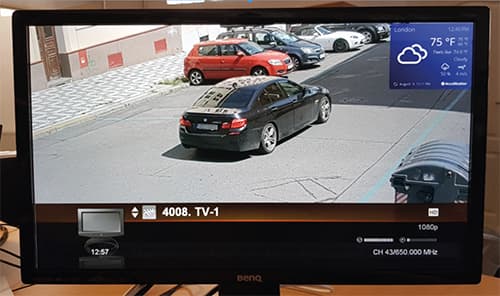
The following article in PDF will provide you with instructions on how to easily add an H.264 video stream from your AXIS IP camera directly into the program selection of your television. This solution is great for establishments such as hotels, where you can have a stream on the TV in each room. With the CamStreamer App, you can also stream it to the internet, and with the CamOverlay App you can put other interesting information into video such as current weather info / forecast, a promo text, or infoticker. Another usage is for example the broadcast of church services to hospital rooms or in senior-citizen homes and also as a security channel in residential housing.
In our solution, we work with DVB-T, which means Digital Video Broadcasting – Terrestrial; it is the DVB European consortium standard for the broadcast transmission of digital terrestrial television. In the U.S., ATSC standard is used, and in this case you will need a different HDMI modulator (for example a PVI VeCOAX MiniMod-2, which can modulate into ATSC, QAM, DVB-T, DVB-C and ISDB as well).